
 In this post I am going to show you step by step how to build your own home bar and show you the tricks the pro’s use in building bars for night clubs and restaurants. I will also show you mine that I finished last year. Now some of you are going to ask how is this farm related and my answer to that it is not. But… if you live way out in the country there aren’t many bars or night clubs to go to so I plan to build one at home so we can have friends and family over and I will not have to drive those country roads at night after drinking where there are lots of critters that like to dash out in front of you. My wife and I have a date night every Friday night and we like to go to bars that serve food with our cocktails and we love to get some hot wings or some other bar type grub. We are going to miss that when we live in the country, so I am going to create a pub at our home similar to the bar I built here at our current home. When I did a post about Plan Your Farm one of the steps was to be a DIY kinda person or have a willingness to learn to be and this is a perfect example of that. Living out in the country there aren’t dozens of tradesmen like in the city to help you, so it is best you learn to do these things yourself and most of all it isn’t that hard. It’s all part of the philosophy of being self-reliant and there is nothing like the feeling of a job well done and the satisfaction of doing it yourself. The first step is to plan where your bar is going to be and what shape you want it to be. I went on-line and looked at hundreds of home-built bars to help me decided. I decided to build a dry bar (without a sink) and to make it L shaped.

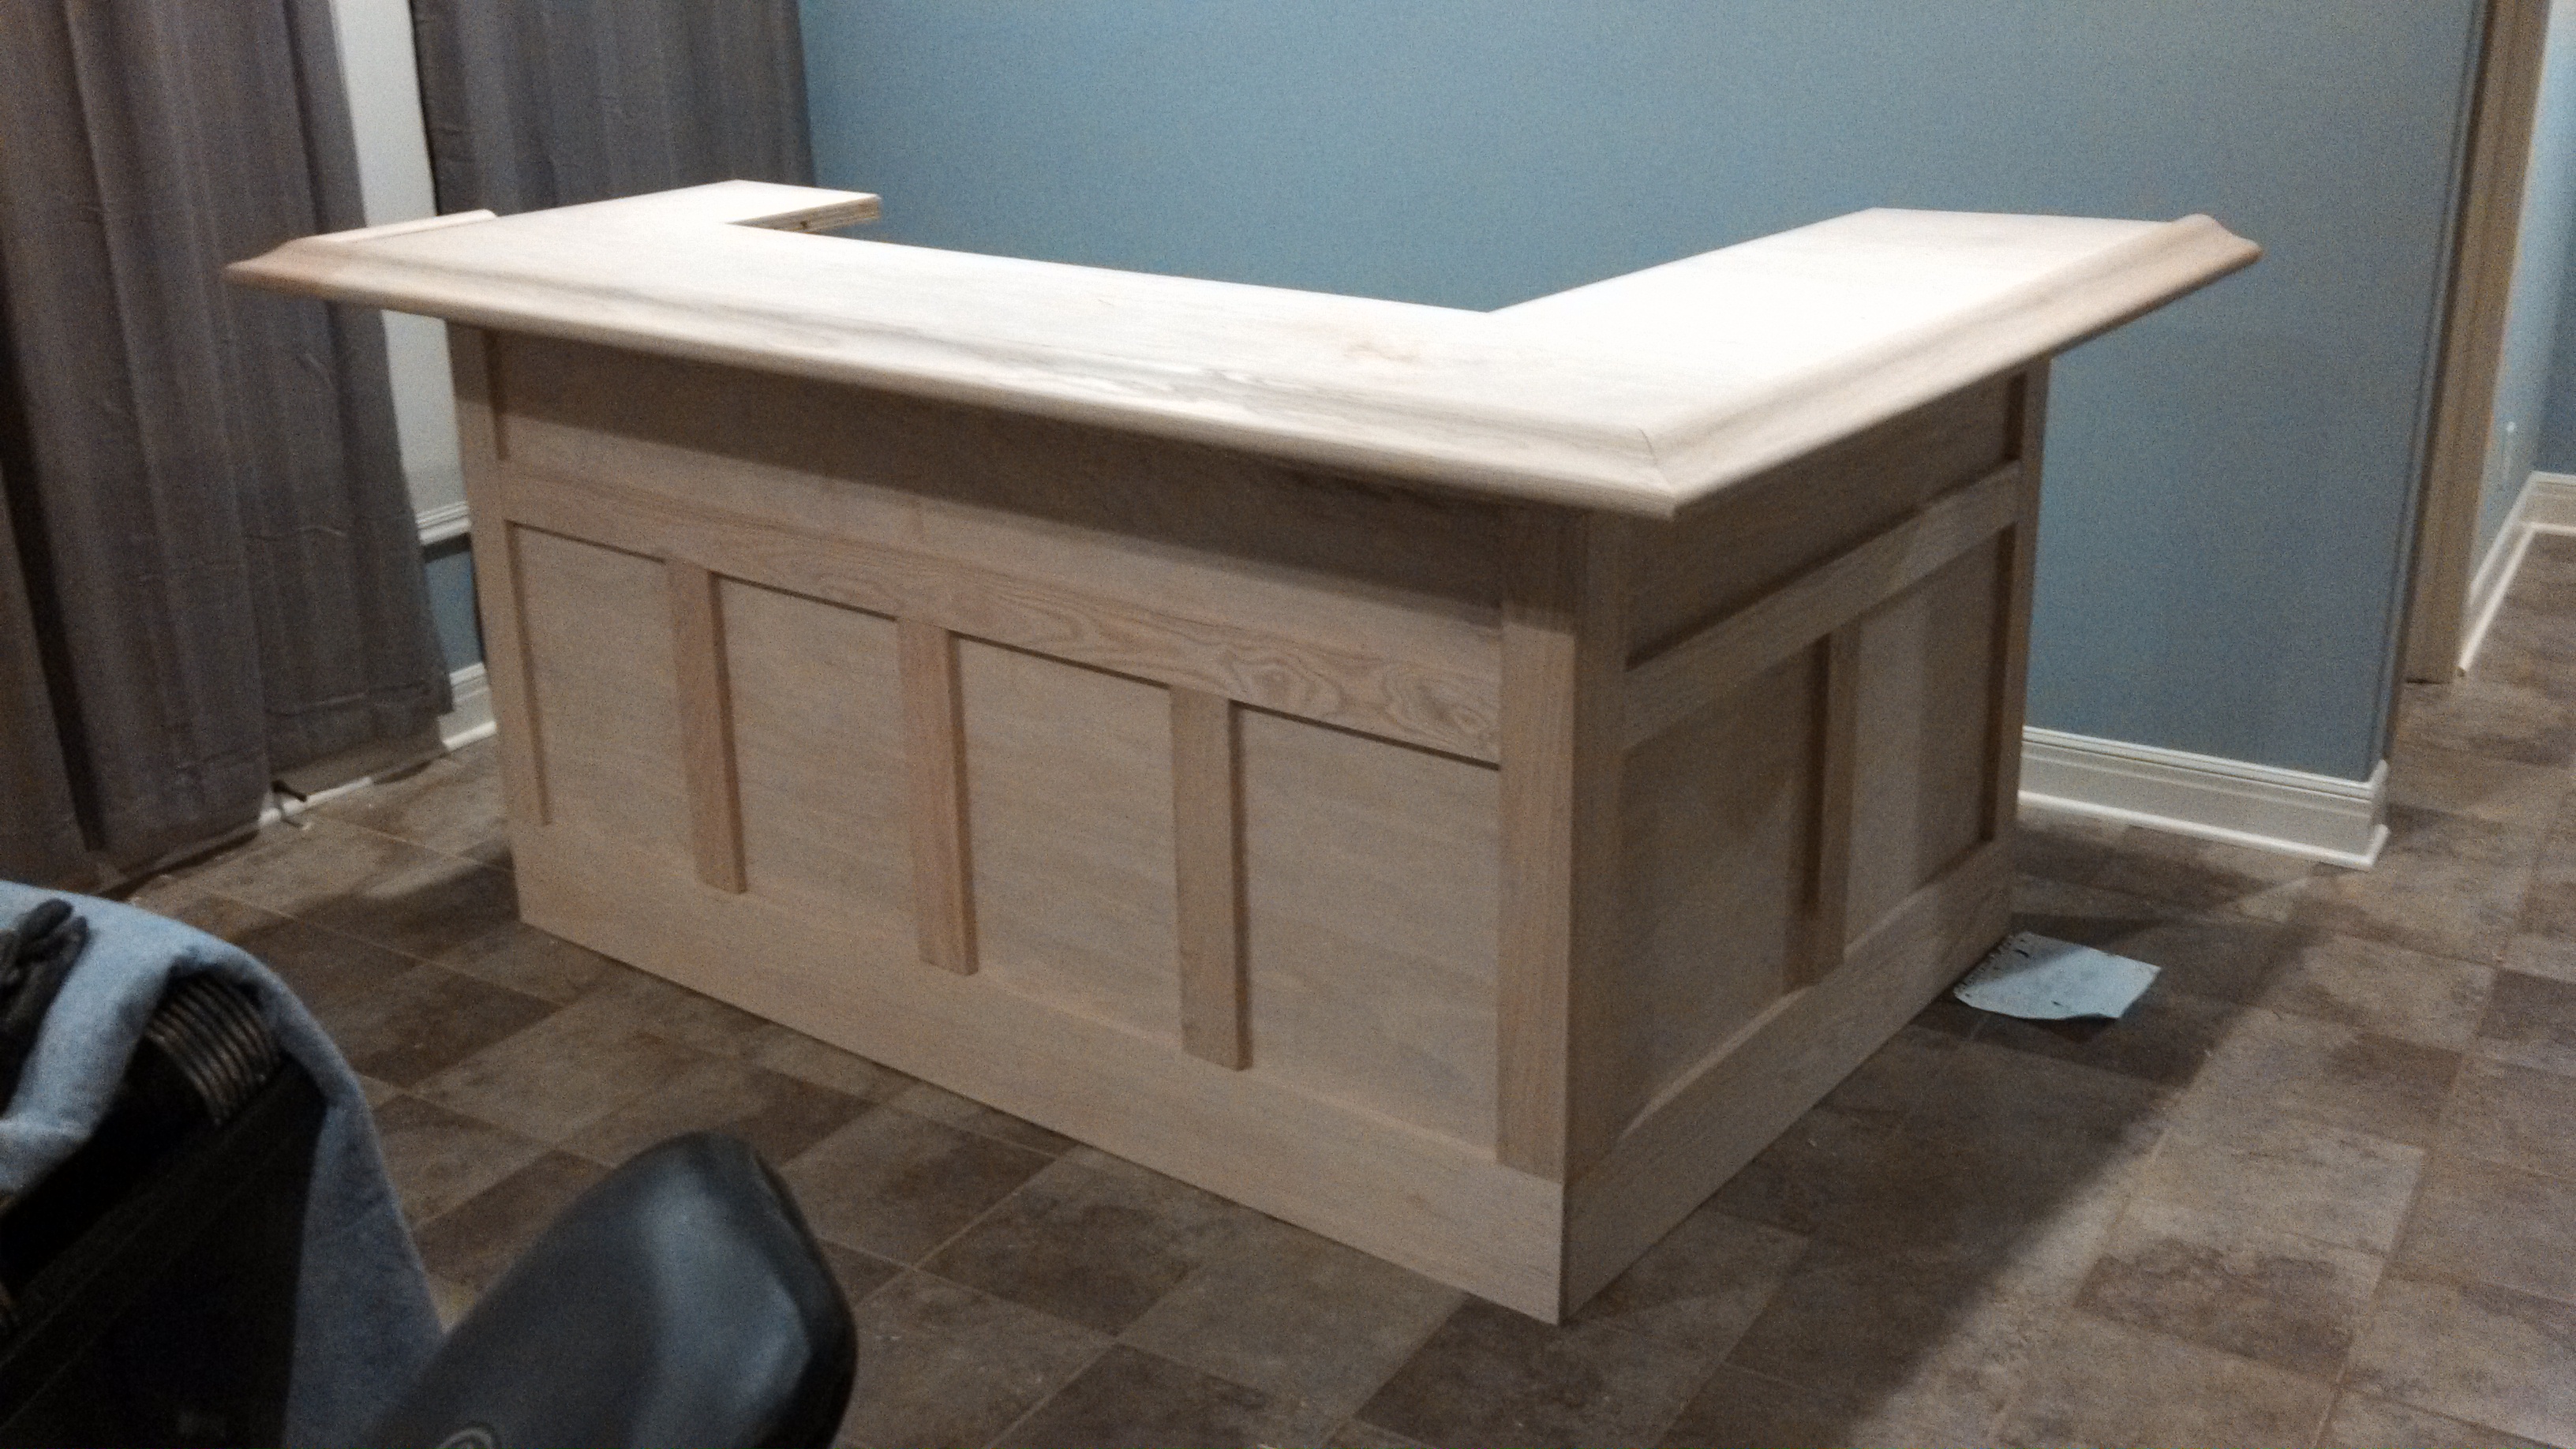
I used 2×6’s to build the frame. The frame is 41” tall by 50″ wide by 73″ long, with the little end wall at the far end only 12″.
The first thing is you have to frame it. I used 2×6’s to frame it out but I think it would be just as good if you used just 2×4’s. The final height of your bar needs to be between 41 to 43 inches tall to fit most bar stools. I built these walls 41 inches tall.

The bar after the oak veneer plywood is added. I used 1 1/2 ” wood screws to attach the veneer to the frame and I only put screws at the bottom, top, and corners where it would be covered up by the oak trim pieces, so they wouldn’t show.
I used oak veneer plywood on the front but you could use pine veneer or a metal diamond plate or even corrugated metal. It all depends on your budget and the look you want to go with.

Then add trim pieces. I used finish nails and Elmer’s wood glue to attach the trim pieces to the veneer. Pre drill your trim pieces first with the same size drill bit as your nail so you don’t split your oak trim when hammering the nail. Counter sink your nails with a nail set and then use stainable wood putty to fill your holes.
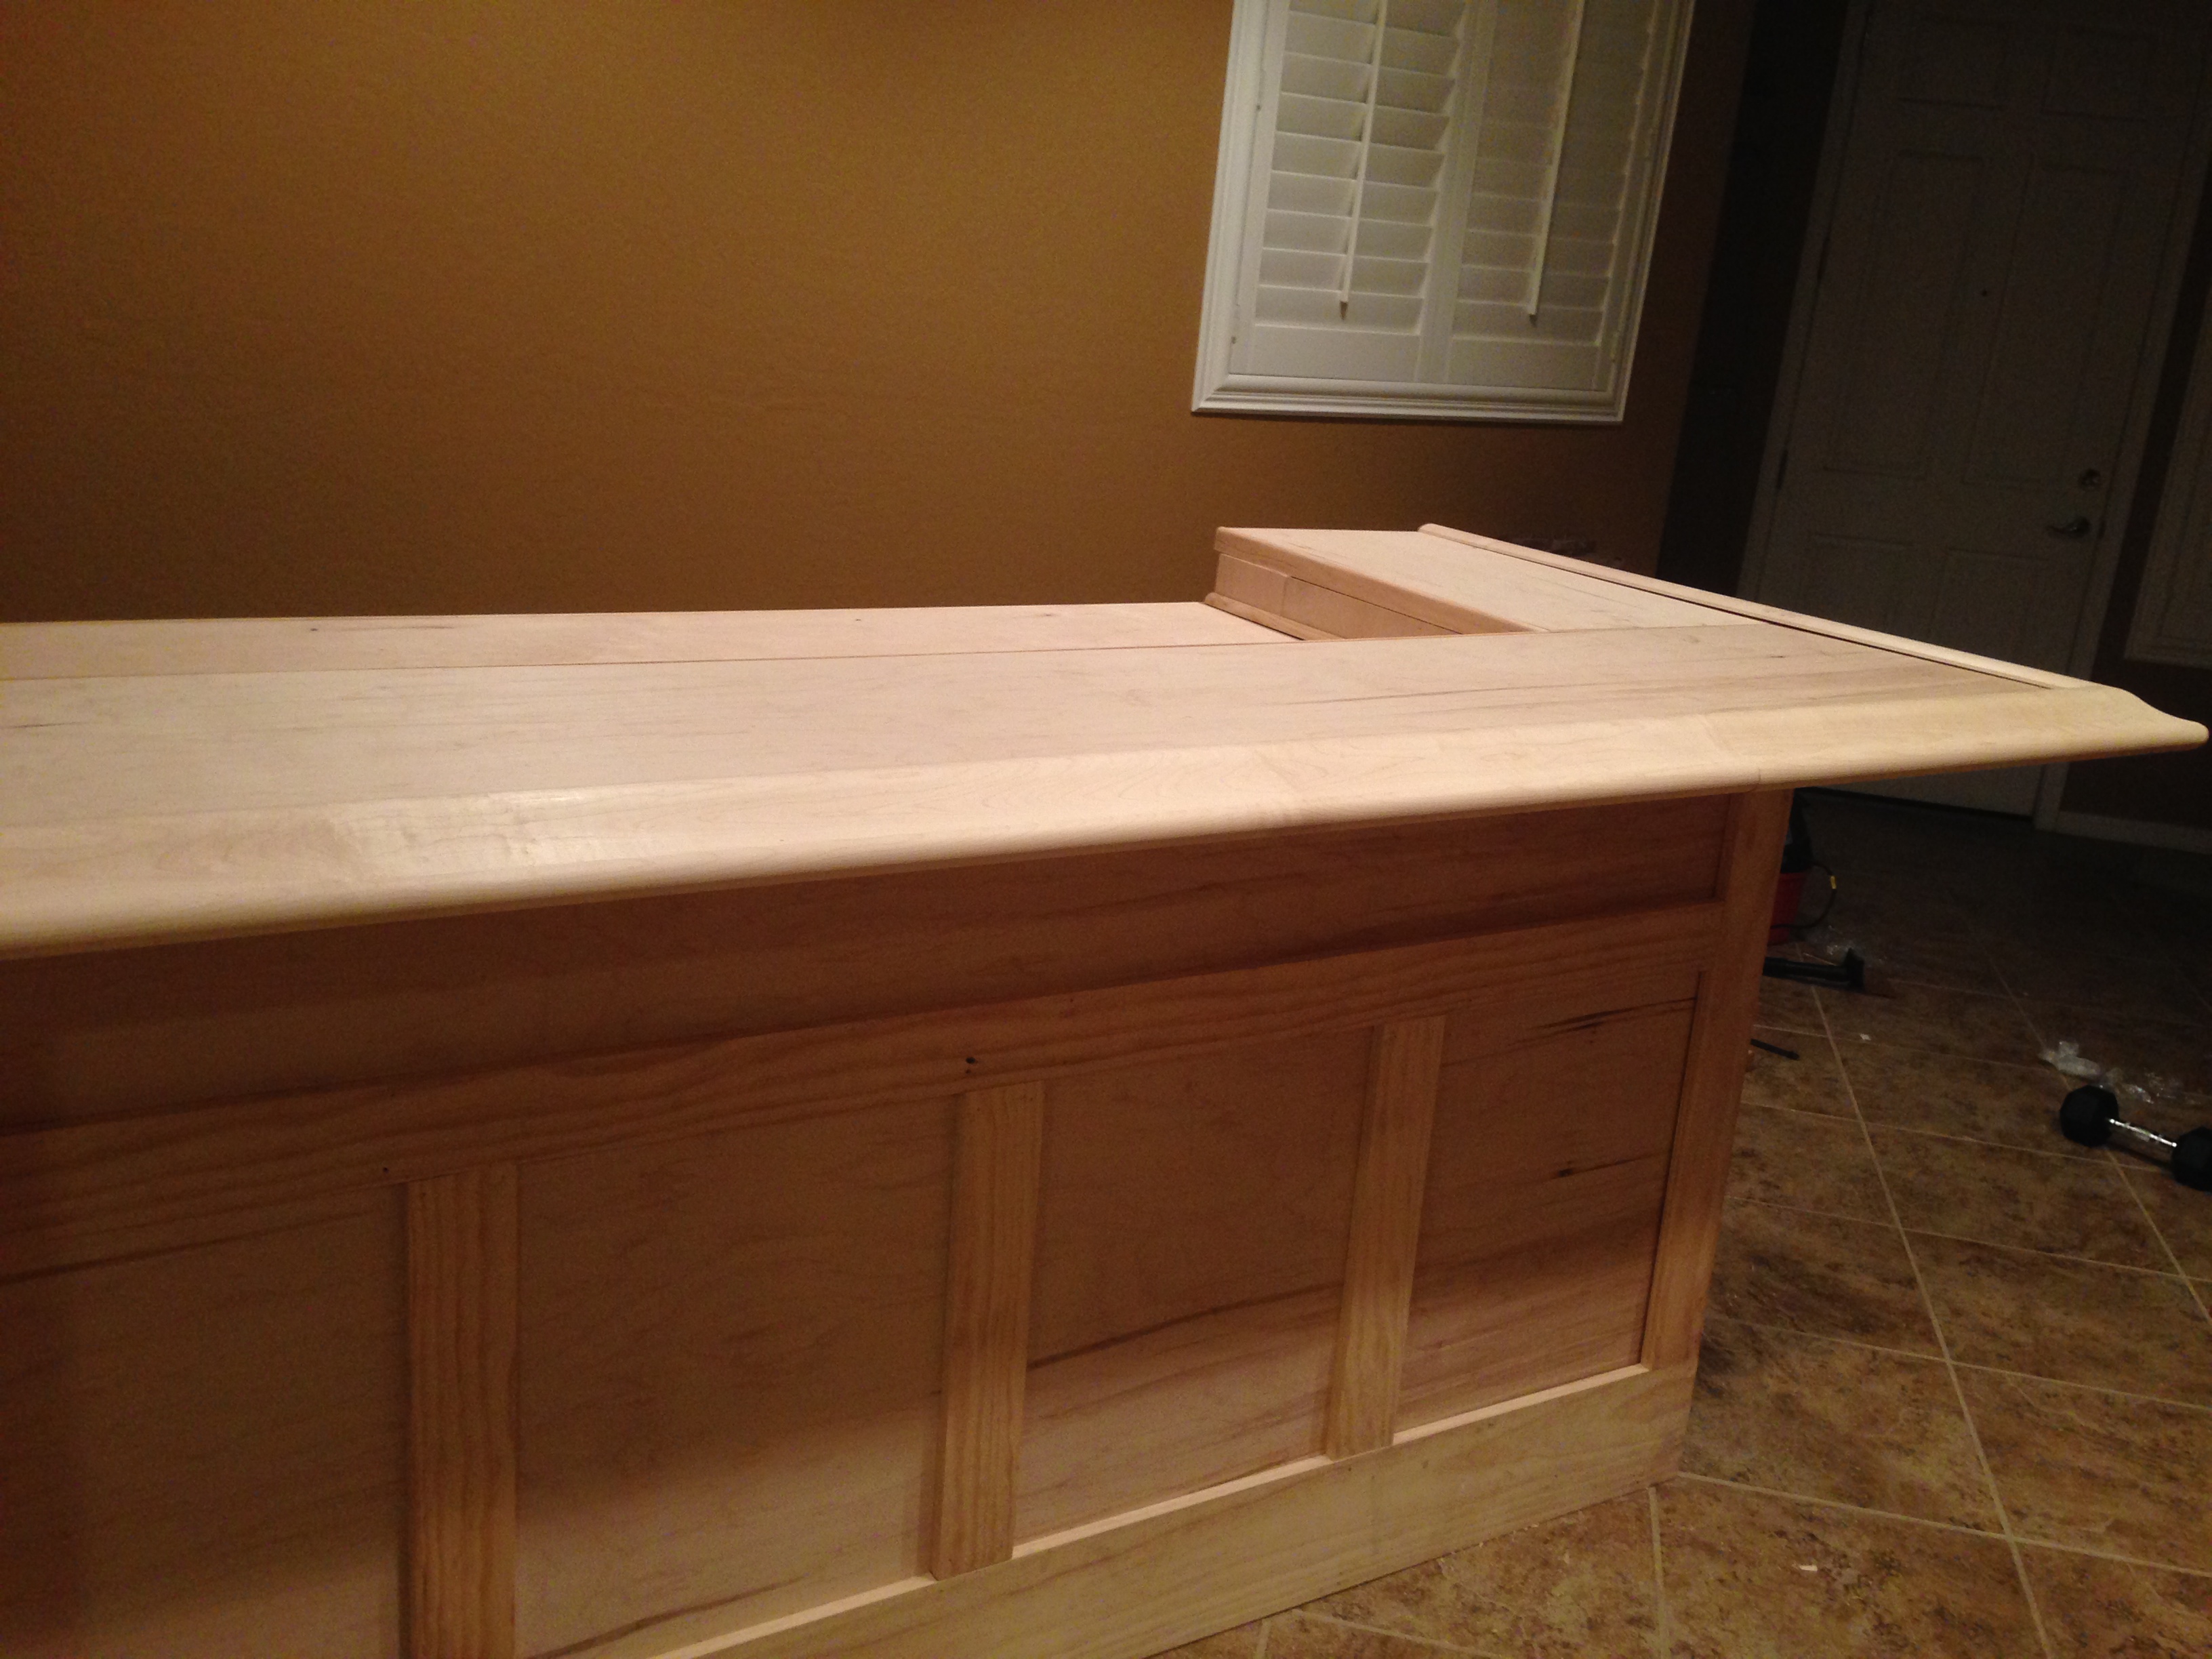
I then added the oak trim pieces, I used a 1×8 on the bottom and 1×4’s to trim it out the rest of the way. The trim gives it detail and depth and hides the seams where the plywood comes together. Pretty simple so far, the next step is to build your bar top, this is where it gets a little more complicated. To give your bar that professional bar look I would go with a Chicago Bar Rail to rest your elbows on when at the bar. It cost about 12 dollars a foot but to me it is worth it. If you decide to build your bar top using a Chicago bar rail this requires two pieces of 3/4” plywood one on top of each other. I bought regular standard sheet for the bottom and another oak veneer sheet for the top. As you can see from the illustration from above how your bar rail sits on the bar top. Your bottom sheet has to be 1” 9/16” wider then your top sheet where you are going to have your Chicago bar rail. I made sure I cut the bottom sheet so I would have 10 inches of overhang on the bar where people will sit and your bar stools will be. This gives you enough room so your knees don’t hit the front of the bar when you sit on the stool and straddle up to the bar. If you use a foot rail you might go with more of an overhang. You screw the bottom sheet from the top on to the frame. Then you rip your top sheet remembering where the bar rail will have to be 1” 9/16” less then what you cut your bottom sheet. You then screw the top sheet onto the bottom sheet by screwing under the bottom sheet. Use 1 1/4 wood screws so your screws don’t come through the top of the bar. Now you can add your bar rail to your top. You have two options here, you can go with a rounded corners or you can go with mitered corners, or you can do what I did and do one of each. I would suggest you go with mitered corners, because the rounded corner is 125.00 each and is also a more difficult to cut your top to fit on the rounded corner. For a video showing how to cut a mitered corner on the Chicago bar rail (Click Here) Mitering the bar rail is easy, just use a 2×4 and set your bar rail onto the 2×4 where the bar rail sits on the bottom sheet of your bar top. You don’t need a biscuit joiner like in the video, just make sure your screws are long enough to go into the bar rail and short enough so they don’t come through the top of your bar rail.
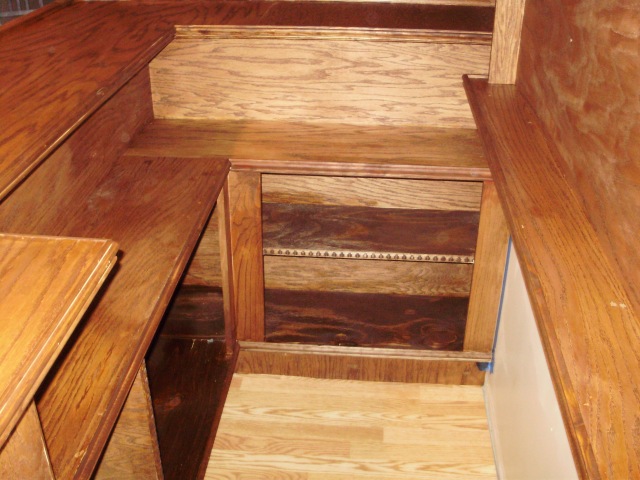
Build your shelves and then add your trim, I forgot to take pictures of the shelves before I stained them. The shelves are 12″deep.
Next step is to finish off the inside walls of your bar. You can do this with drywall or if you have enough left over pieces of veneer plywood you can do what I did here. I also trimmed out the edge of the bar top using 1” 1/2” pine molding. I put on the pine molding so it stuck up 1/8” higher then the bar top. This act as a dam when you apply the two-part epoxy to finish the bar top. You will apply this after you have stained your bar (I will show you later in this post). I then attached the corbels to the bar by drilling and then inserting two 1/4” wooden dowel pins into the corbels and the lining them up on underneath the bar top where I wanted them to go, marking where the pins line up and using a 1/4 bit and drilled the two holes where I had it marked. I then added some Elmer wood glue to the pins on back of each corbel and then added them to the bar.

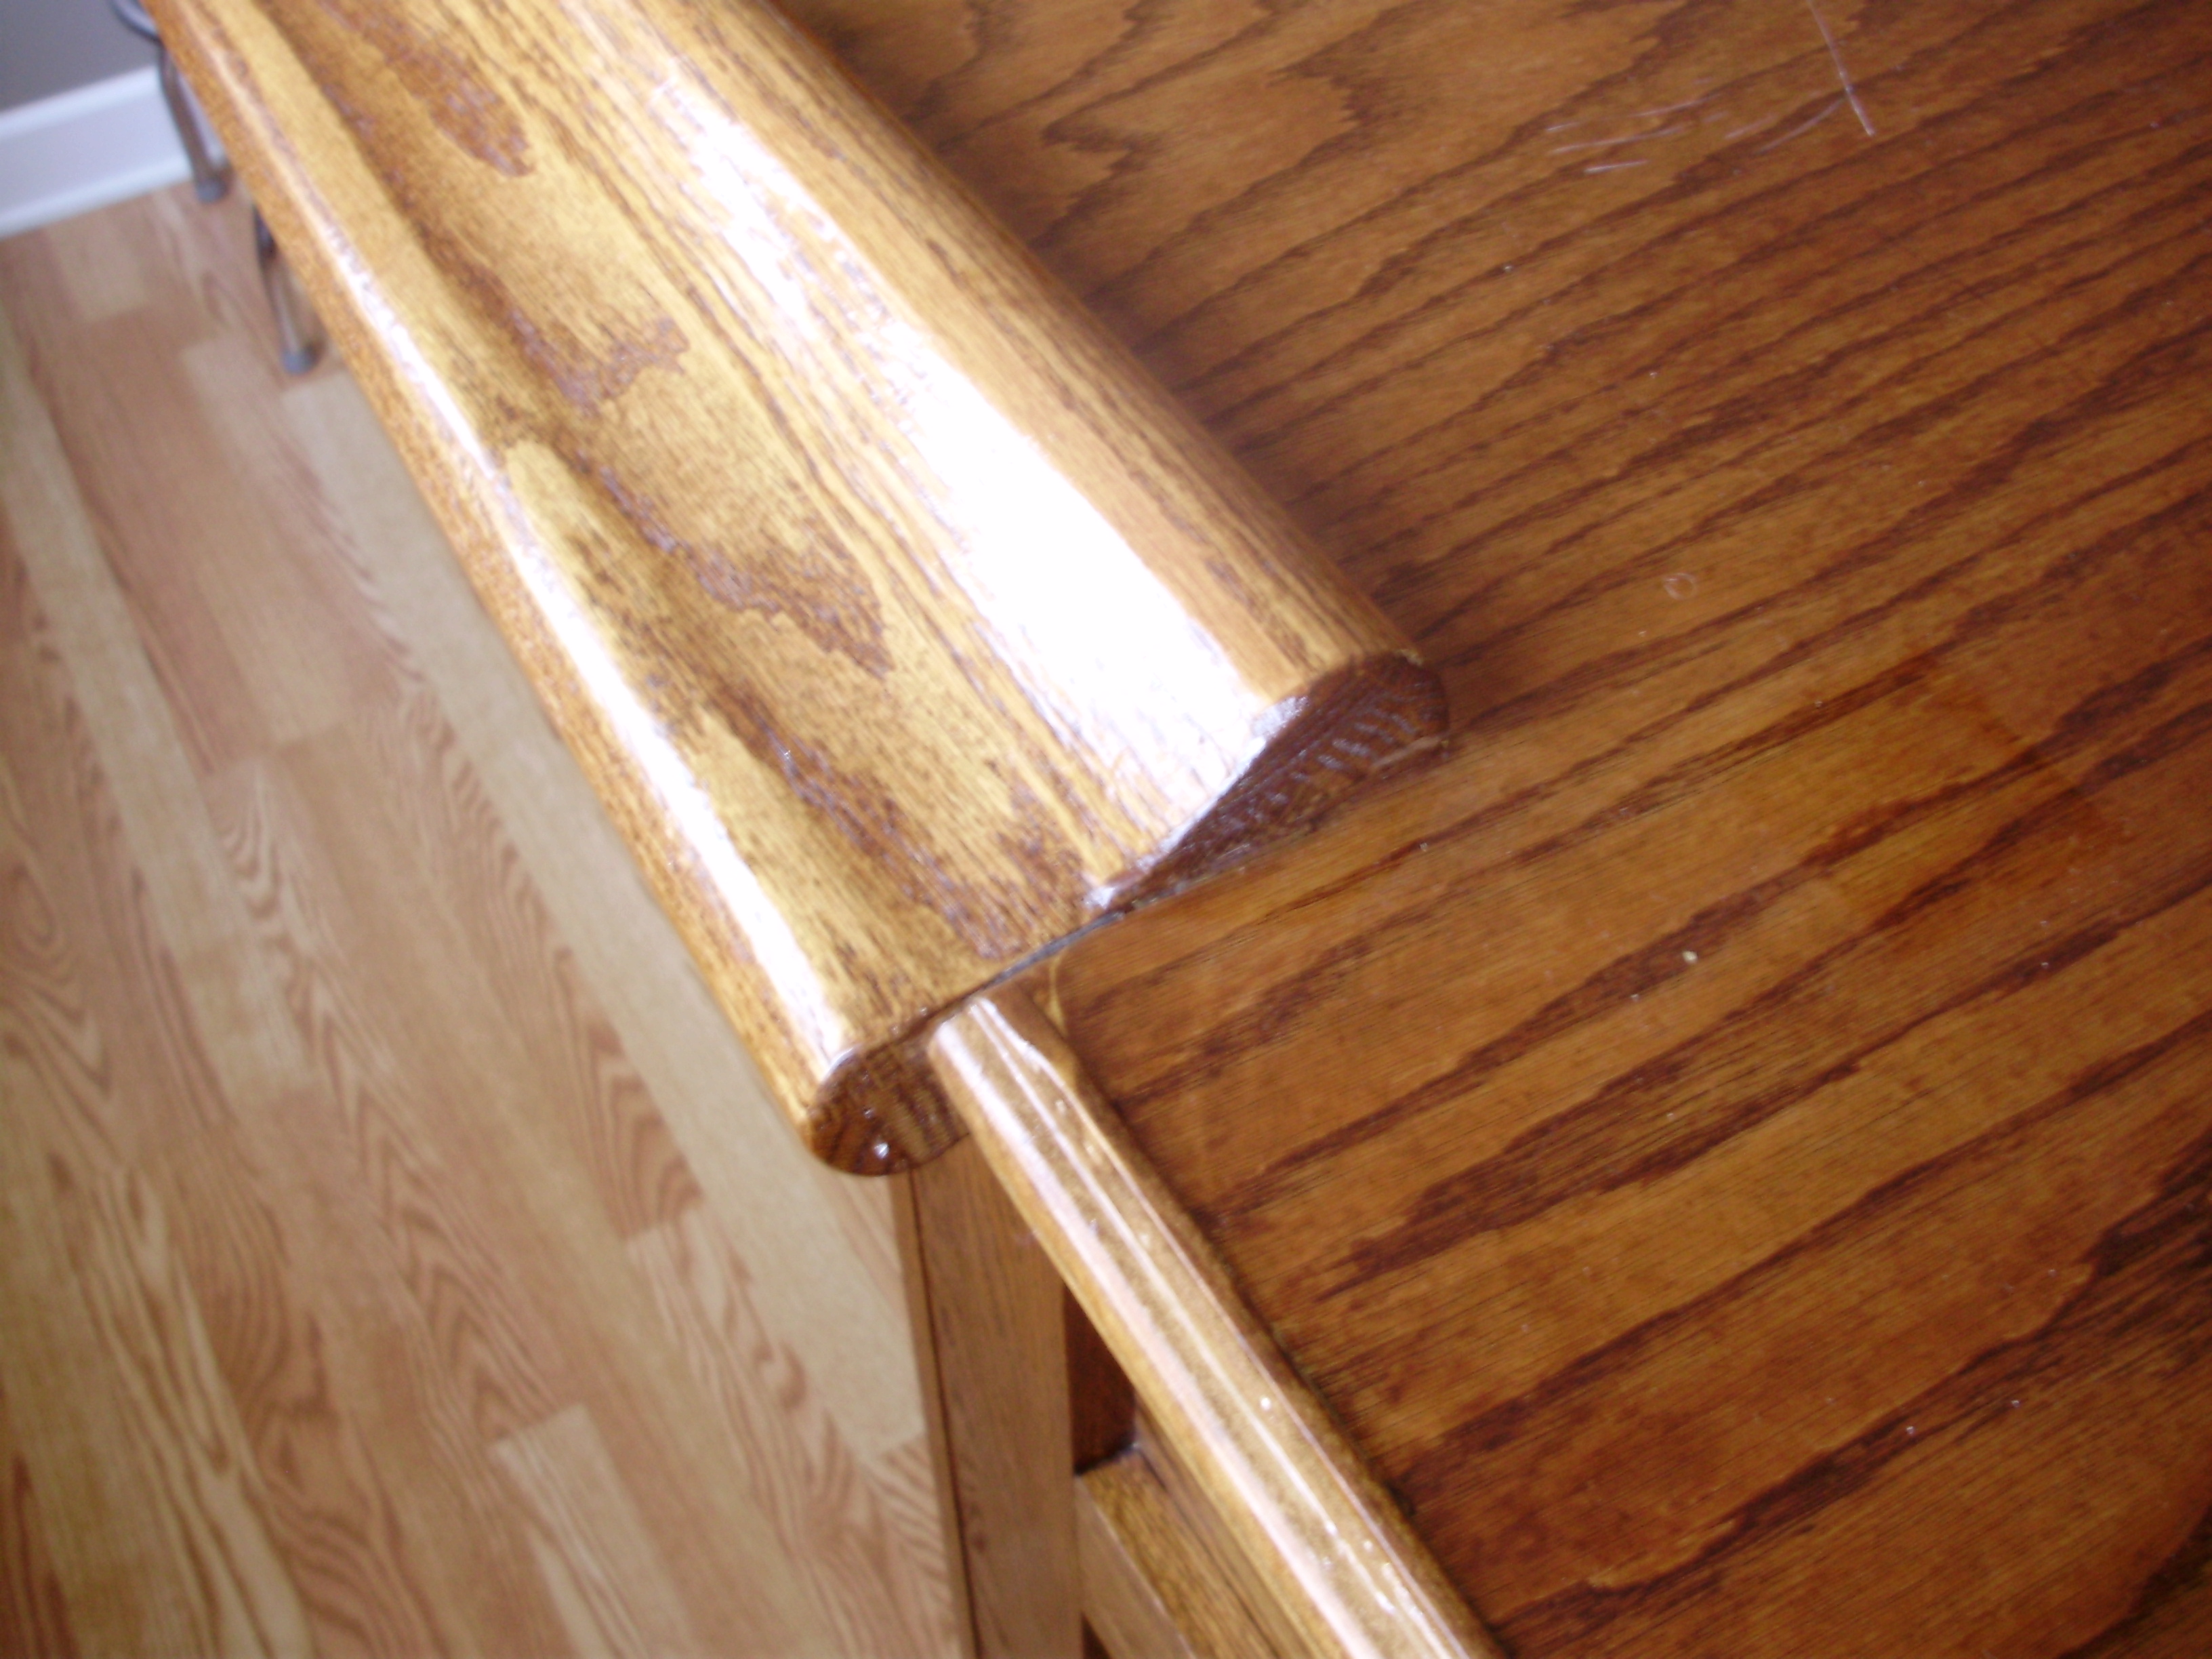
This is one of the two corbels I added to the bar to give it more interest and detail. You can also see in this picture how I attached the bar rail by using wood screws and screwing from under the overhang. My overhang is only 9 inches, I wouldn’t go less then that and not over 12″
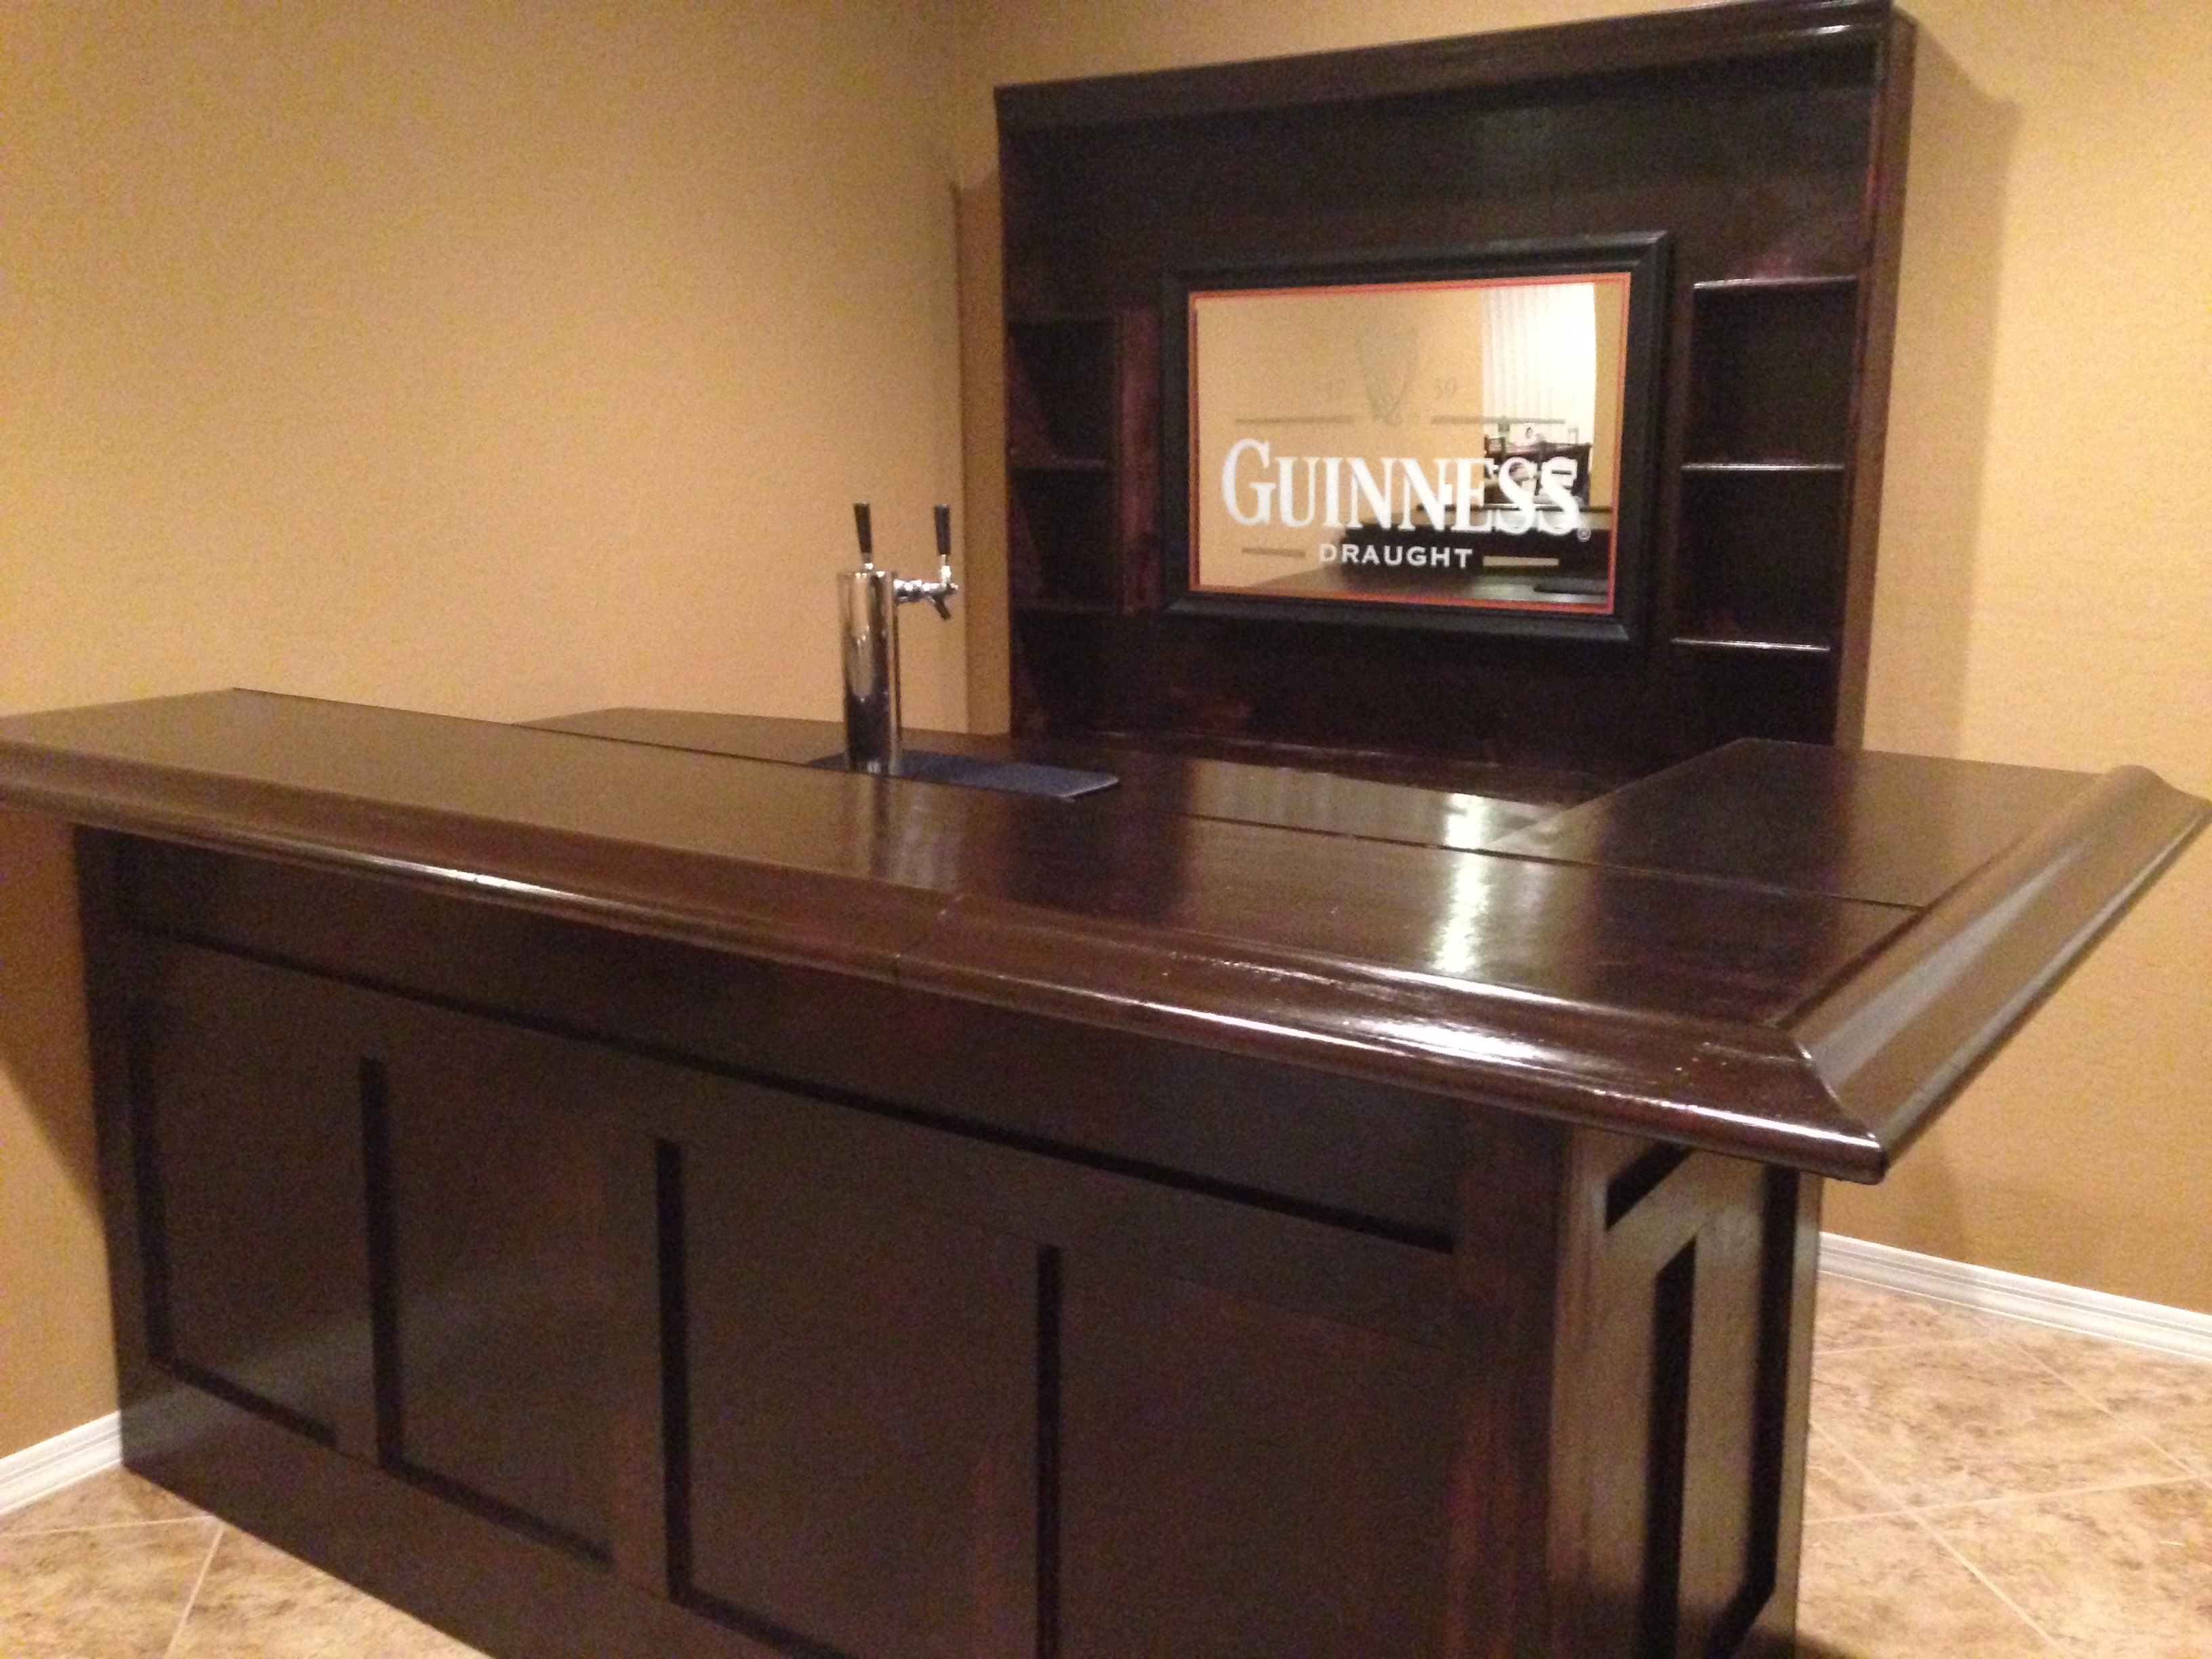
I then built my back bar by using another oak veneer piece of plywood with oak 1×4’s on each side of that with and then an oak 1×6 for the bottom shelf where your liquor will sit and then an oak 1×8 on top. I then added some crown molding to finish it off on top and some pine trim to go around the bottom shelf.

attach back bar by screwing it into wall studs so when you put the bar mirror up it will hide screws.
The next step is to sand and stain your bar. I sanded the entire structure using a medium grit sand paper. I then wiped it down using a damp cloth, the damp cloth raises the grain. You do this because the stain will raise the grain in the wood and this step keeps that from happening. I then sanded the entire bar down again this time using a fine grit sand paper. I then stained the entire bar and back bar. Now your ready for your two-part epoxy finish on the bar top. This is what the pro’s use to protect the bar top from spills. First you must make sure your bar top is clean and dry. For a bar the size of mine, I mixed up about a quart with the two equal parts together. They must be of exact equal parts or it will not harden. I then stirred it slowly so to not create bubbles in the epoxy but stirred it very well before pouring it out over the entire top of bar. Then spread it all over with a plastic scraper or use an old credit card like I did. The epoxy is self leveling. This epoxy just goes on the flat part of the top, you will use polyurethane for the Chicago bar rail and the trim and the rest of the bar. One quart was enough to cover my entire bar top. I then let that dry completely and roughed it up with some sand paper and then put down another quart. You could also put down baseball cards or pictures or other memorabilia on your bar top before you pour out the epoxy to have them embedded in the top to give it more of a personalized touch and could show your hobbies or interest. If you do that you will have to add a second layer, and you do that by letting the first application dry completely, then sand the area using a medium grit sand paper and then do another pour. You can keep doing this step if you want to embed something thicker like bottle cap.

The two-part epoxy gives your bar a glass look and protects your top from spills. My bar top is 82″ long by 18″ wide

This is the other end of the bar top so you can see how it was finished off.
 After your bar top has dried is when you brush on your polyurethane to the Chicago bar rail and the rest of the bar. After the first coat dries, sand it down using 0000# steel wool and then put on another coat.
 That’s it, now that you have a little knowledge on how to build a bar you can build your own. It does take some time to do it right but it is worth it. All the parts for this bar was purchased at my local Home Depot except the Chicago bar rail. I bought the bar stools at an auction where the restaurant was going out of business, they matched perfectly with the stain and style of bar I chose to build. The rest of the bar signs, lights and mirrors I had been collecting for several years. I have also added photos of the rest of my bar down below. I found it easier to build the bar then to write how to build it. If anyone has any questions on how to build a bar you can ask them here on this post, no matter how old this post is. I will be happy to answer them if I can.

Name your bar after getting it done.
To get your own personalized bar sign for go here. 

Some hard apple cider and blueberry wine I have made

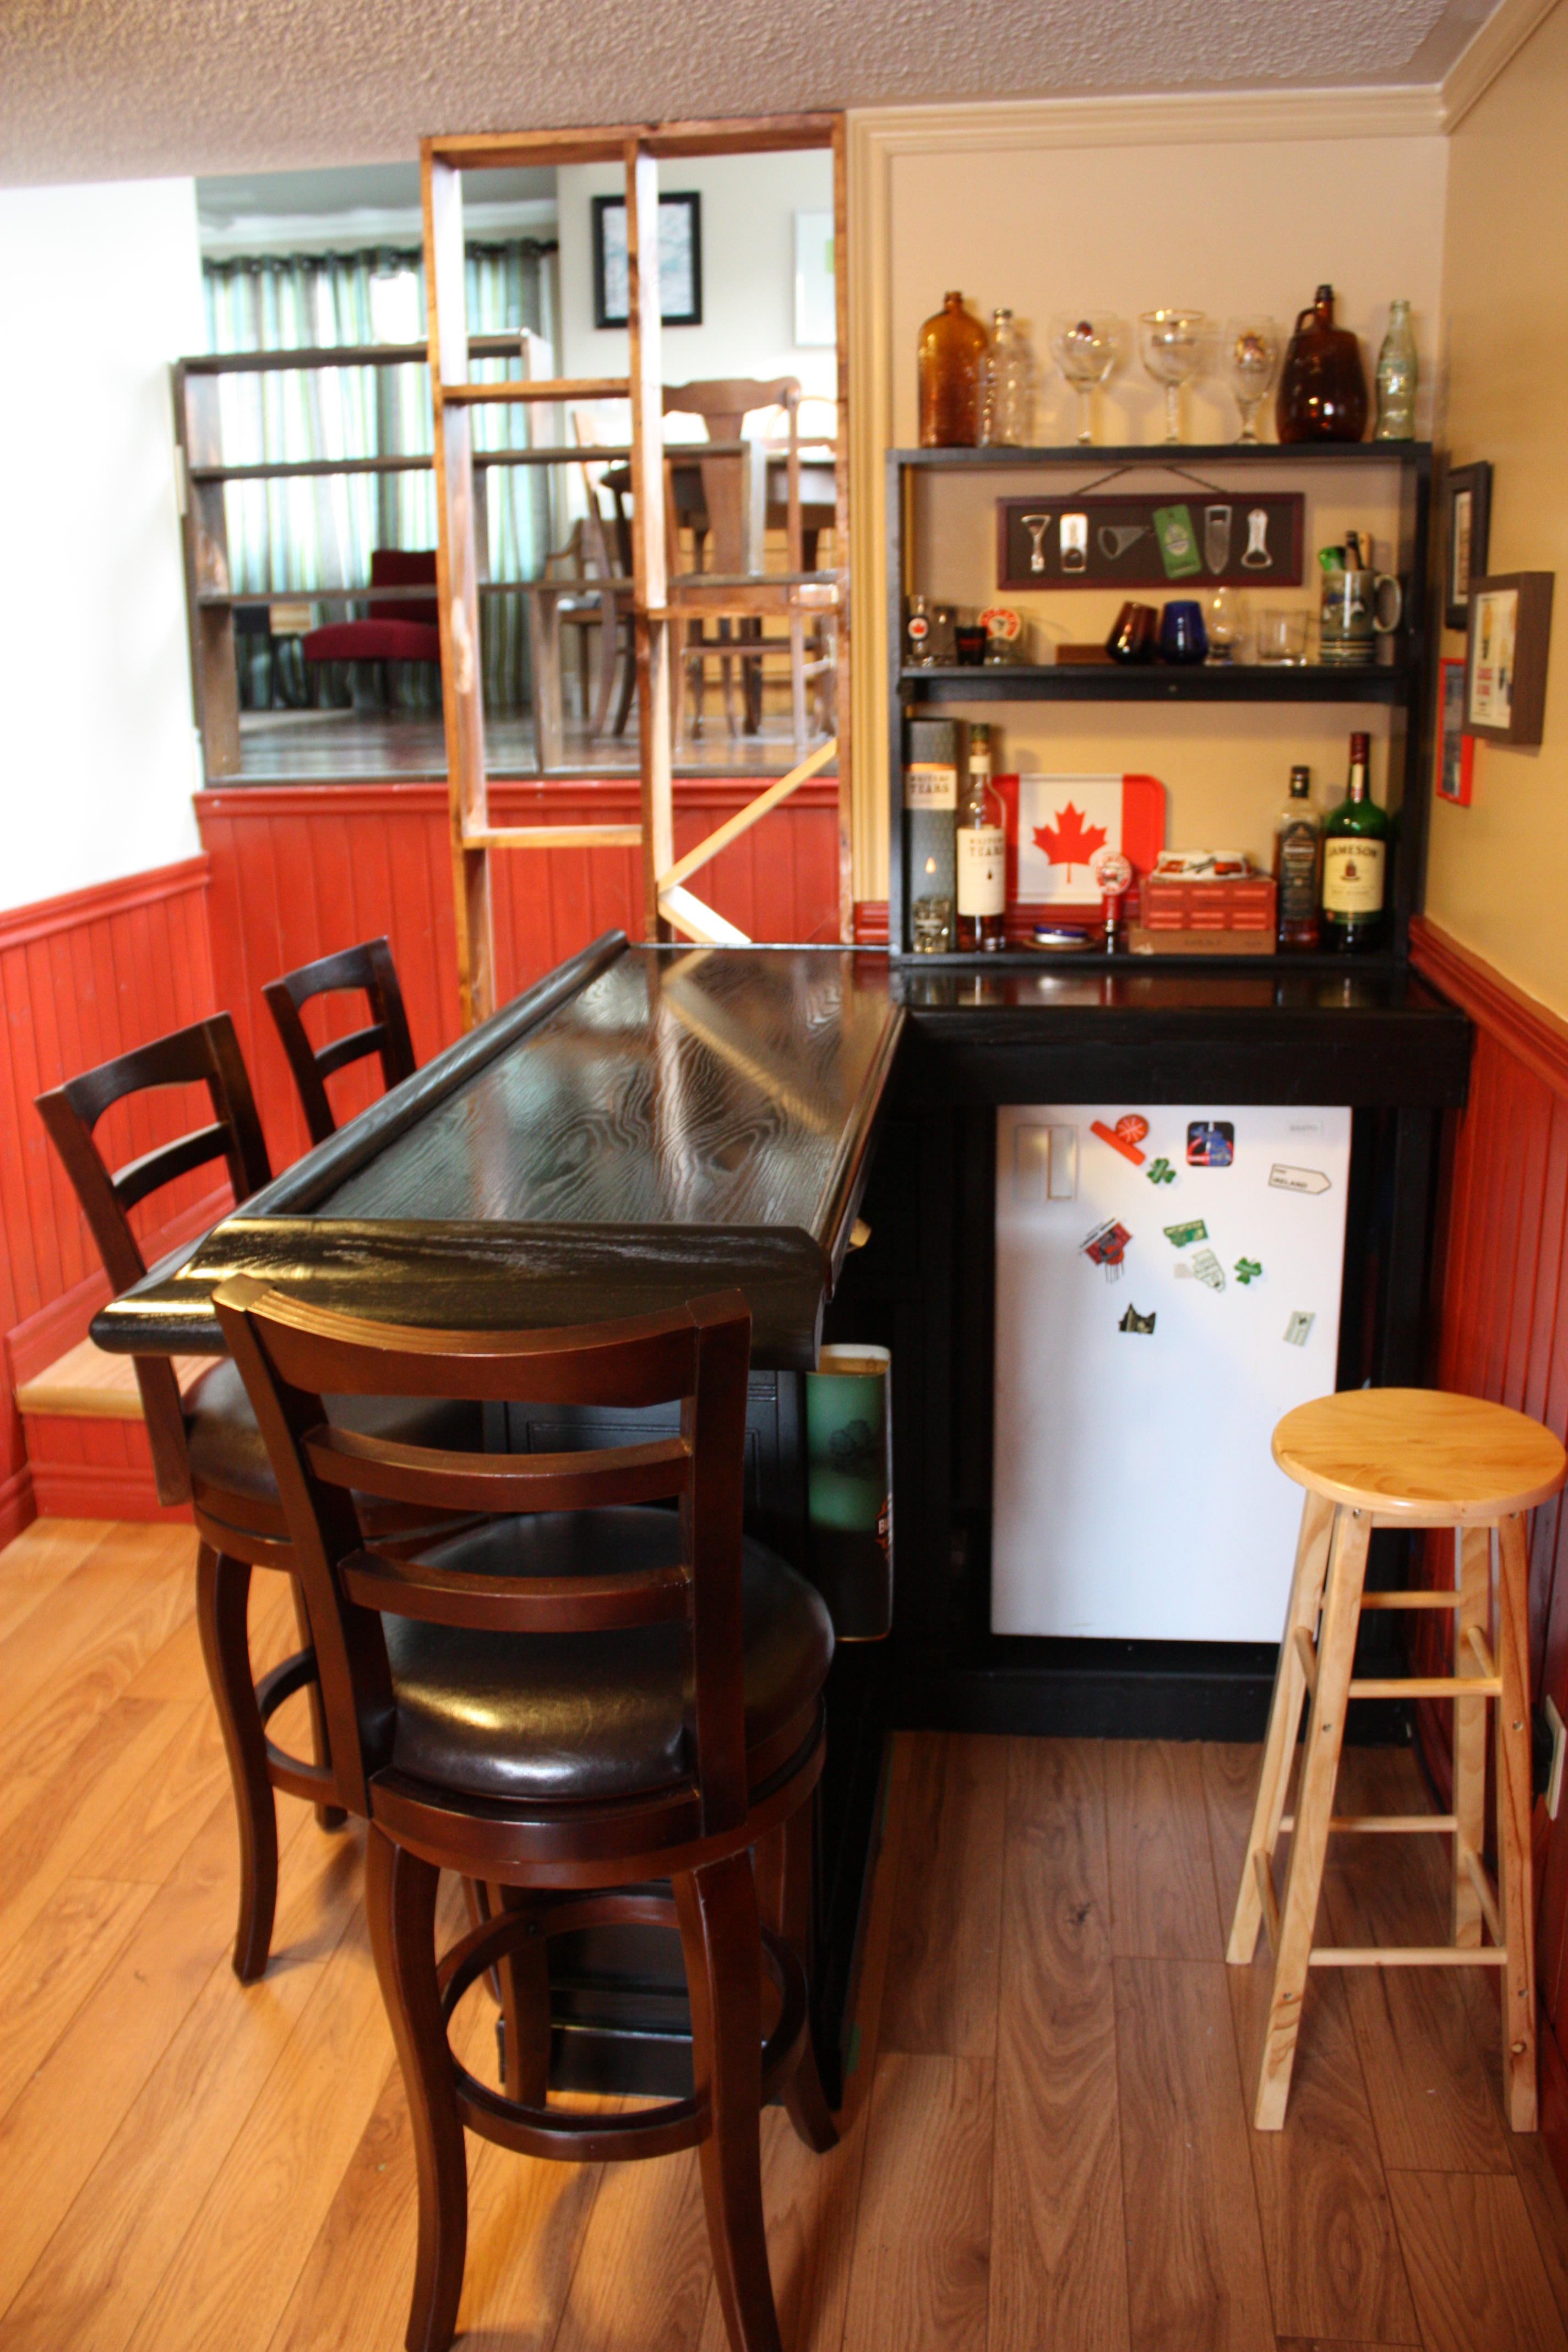
That’s all the pictures of my bar and man cave, down below are pictures of bars others have built using my bar design and have sent me pictures of their builds.
This great little bar was built by Jake, one of my readers

This is how Jake did his shelving, this is exactly how I did mine.


I love Jakes idea of putting lights under his bar top.

This is a picture of a bar one of my readers, Adam Urbach built after reading my post. Nice job Adam

This nice bar was built by one of my readers Cy Kollar

Cy did a good job on the shelves
This bar was done by Matt Hines who likes to brew is own home brew.

Matt built a place for his keggerator into his shelves.
I really like what Matt did for the back bar. I am just waiting now for my invite to try some of the home brew.


This great little bar comes from Aberdeenshire Scotland and was built by David Batty

David used 2×2’s to frame his bar with veneer plywood over that. This works out great, its the plywood that gives the frame its strength.

Here’s what David had to say about his project.
“I made mine with oak veneer MDF to save on cost, I got the solid oak corbels on eBay for a song. I couldn’t get the bar rail locally in Scotland so I used solid oak
molding made by my local joiner. The detail is solid oak skirting
board. And the resin top turned out fantastic – that was a great idea, thanks. I have really enjoyed doing it.
>
The wine rack and sofa and extras are all made from reclaimed wooden pallets that I got for free. It was officially opened New Year’s Eve… Magic!”

Here’s the best part, this was all done in this man shed in David’s backyard. What a great idea.

These next four bar pictures are from Frank Chenette. I like his better than my own. Great job Frank


This bar comes from all the way from England and was built by Michael Grady. I like how this bar fits in real well with the brick work.

In all my wildest dreams, I didn’t think this post would help this many people build their own bar. Keep the pictures coming in, I love how tis post keeps growing.

This is the finished bar and this is what Mike had to say about his project. “Your inspiration started it all , the whole project has brought me allot of pleasure, and the things learned have opened up a bigger world in woodworking for me. I think it’s really a great thing you have accomplished touching so many by helping folks create their own special place. Good show old boy, as we say here.”

This great looking bar was built by Denise and her hubby Gene. I like the look and corbels on this one, nice job on the back bar too.

This nice bar was built by Dwayne Jones. I like what he did here using total different materials than what I did on my bar and I love it. Like I said in the post this is just a guide and you can add your own materials and ideas.

Here is another great looking bar from one of my readers Mark Dunlap. Great job Mark.

This all pine bar was built by Chris Smith a West Virginia State Police Officer for 21 years. It only cost him 350.00 dollars to build and shows you don’t have to spend alot to build a great looking bar. Thanks for sharing this bar with us Chris.

This great looking bar was built by Todd Kreykes I really like what he has done here. This is a amazing looking bar.

I have to get back to you on the name of the person who has done this bar. My computer crashed and I now have a new computer and have to some how retrieve that information from my email on the old computer. I have now got his name and it is : Brock Miera
This post has now gotten too big to add new photos, please click Here to see more pictures of bars that people have built using my plans.

I just finished building my bar following pretty much your design and it came out great! I never built anything in my life let alone used a saw, so thanks for the great post!!
Hey I have a quick quick question….I want to build this bar but The spot I want to build has carpet….is there any way to anchor this without cutting out the carpet? How did you anchor to the ground? Thanks!!!
My bar is not attached to the floor. I do have it attached to the wall but you really don’t need to attach it at all. This is heavy enough to stand on its own. I hope that helps.
how much did all of it cost you to build??
I spent about 900.00 us dollars to build this all oak bar, but as you can see from the pictures of other readers bars, you can use different materials and do it for much less.
I have been looking so some ideas and methods and this has really helped me !!! Big thanks and also the ideas from others really helped 🙂
I’ve been looking to have a bar built, but the prices that were quoted were ridiculous. Thanks for sharing this. I now have a project to complete for 2016. This sounds very affordable and a beautiful design.
Thanks Matt, looking forward to seeing pictures of your bar once it is finished.
Hi, Can you tell me the dimensions of your bar top and possibly explain a bit more in detail the steps on how you built the frame as well? I am going to use this step by step guide you have to build my own bar for the basement of the house my girlfriend and I just purchased
I’m building a 16 foot bar in my 3000 square foot barn man cave project. I have a few questions from your build. What size plywood did you use over the frame? 1/4 inch? I know you used 3/4 inch for the bar top, with that said how many inches overhang of your bottom 3/4 inch bar top was it before you added the bar rails, and how wide did you cut the bar top. Last question what is the bar top surface demensions? I’m a little confused regarding cutting the 3/4″ bar top. Sorry for the dumb questions!
High Mark and Eric, all the questions you have asked have been asked before in the older comments section, so please look there. I know there are many comments to look through but I have done this bar so long ago now I don’t remember what the dimensions are anymore and I have sold our house where the bar is located.
These bars are absolutely incredible. I just bought a house and am starting to build a bar as well. I’ve never built anything in my life like this, so I hope it goes as well as yours. My only concern is the cost. Is it much? Great bar!
Hi Alvin, to do it this way I spent about 900.00 us dollars but you can use other material and do one that would cost much less. Good luck on your bar and don’t forget to send pictures when you are done.
I am wanting to surprise my husband with a bar of his own in our basement and I am so glad I clicked on your site it is very helpful, I don’t know how to bulid anything but I know I can do this, thanks ☺
My husband and I are doing a bar. I want to put metallic epoxy on the top and make a really pretty design. My question is what do you use as a primer on the wood before you lay the epoxy? some one told us we had to use a flex primer,but you can only purchase it in 5 gallon buckets at $300/bucket. Thank you in advance for your reply.
Hi Dawn, I didn’t use a primer for my bar top. I did make sure it was sanded good and there wasn’t any sawdust on it before I stained it. If your top is painted I am not sure how it will react to that. If you just have stain on bare wood you should be good. The epoxy should have no trouble gong over that.
Probably one of the best posts I’ve yet found on building a bar. I can’t wait to get started. Great work, thank you!
Where can I find the plains to build this bar.
Hi Stacy, sorry there are no plans. If you read all the post and the comments will tell you what you need to know to build this bar.
Hello
I’m looking to build a bar in my home. I have found two bars I would like to build. One bar is from Matt Hines and the other one is Frank Chenette
Please help me find plans for either one. Both guys build a great looking bar.
Please help
Hi Stacy, Matt Hines here. I didn’t have any specific plans that I used in my take. I used Gordon’s original setup as the base and then expanded it to meet what I was looking to do. For me is was building the back the bar out big enough to put in the kegerator. Most of the add-ons and all of backbar were just me winging it. My email is m_hines_84@yahoo.com if you want talk a little more on the specifics and see what I can do to help you out.
Thanks for helping out Matt.
Thanks so much for these amazing instructions. I just finished my bar with your help and it came out amazing! I am not looking for a back bar mirror. What size is yours?
Hi Anthony glad to hear your bar came out great. I am happy my instructions were a big help. I no longer live at the house where I built the bar and I can’t remember what size mirror it was. Sorry
Of all the videos and instructions I have found none of them show how to connect the 4×6 bottom frame boards when they are laying flat. One did say they used metal angle braces. Is that what you did or do you have another idea as to how to connect the foundation boards together.
Hi Frank, I am not sure of your question, do you mean the 2×6 frame boards and how it is connected to the bottom 2×6? Just give me a little more info and I will try and help.
The very first thing to do is to lay out two bottom boards (4×6) on the floor in an L shape. How do you connect them at the L?
Sorry, I meant 2x6s not 4×6.
You could do it that way but what I did was build one wall at a time. You build the wall on the floor and then you stand it up. So instead of your bottom plate being flat as it would sit on the floor I would put it on its side (the two in side) and you would also have the top plate on its side and then you would add the 39″ studs 16 on center on your wall. That way you can nail or screw the wall together before you stand it up. You than do your next wall the same way and than you would stand that up and then screw the two walls together. I hope this makes since I have had a couple glasses of wine and I don’t know how this sounds.
Thanks Gordon. So, you’re saying the bottom boards would not be attached to each other? My situation is a little different since I’m building the front and side walls with glass blocks so I can light the bar up. What you say might work but I’ll have to build the walls standing up. Thanks again, I’ll let you know how it works out.
I see, will in that case you might want to attach the bottom boards so the bar stays together. It sounds very interesting what you are going to do. I hope you send me pictures when its done. Good luck
I will, thanks again.
Thanks so much for posting this. I used your website frequently to plan and build my bar. Here is the finished product. I’ll buy you a beer if you’re ever in the DC area. https://imgur.com/gallery/Q1m5F
Wow Alex, great looking bar, I am impressed and thats coming from someone who knows a great looking bar when he sees one. If I am ever in the DC area I will stop in and have a cold one with you. Cheers.
Everyone please click on Alex’s link to see his bar it is awesome.
Alex,
Did you do the flooring first? what type of lights did u use underneath?
Yes I did my flooring first and didn’t use any lights underneath.
I was hoping that Alex would reply hahaha
Alex- I live in the DC area any chance we can commission you to build this for us?
just wondering.. what is the size of the Corbels? The sizes I see on line are 10x5x5 but if your trim is 1×4 wouldn’t the corbels be too large?
Hi Darren, I don’t recall saying in my post that the corbels are 10x5x5. I looked back through my post and I can’t see were I said that. Anyway you are right they are not that big. They only look to be about 3 inches wide. I don’t have the house any more so I can’t go back and measure them for you.
I meant the sizes I see online to buy are mostly 10x5x5. I didn’t mean the size you used.
Ok, I see that now sorry i miss understood you. You can buy corbels at home depot the size you need. I just built an island for my kitchen and used corbels that I got from there Go to my post “Up Stairs Is Done” and you can see those on the island. Good luck on your own project.
I like the color of the bar that Matt H ended up with. Can someone tell me what veneer and trim wood he used as well as stain color?
I just built a bar would like to add photos I followed your base plan and modified for mydrlf
Cool, I would like to see it. Just send me photos at gordonmilligan56@gmail.com. Looking forward to seeing them.
I built a bar based on your plans in the fall I am sending you the pics…
Wolf
My boyfriend and I can’t thank you enough for your post. We really wanted to build our own bar but all the plans we found were way to complicated for non-construction people. I only wish I could include a photo. It turned out incredible. We modified your plans to build a 8 ft wide by 5 foot deep (finished product) took us around 8 hours and only cost about $500.
Thanks Kathy for your comment. I am glad my post was some help and I know you two have the satisfaction of having done it all yourself, enjoy.
Cheers,
Gordon
Hi the bar you built is AWESOME. Can you tell me where to get the crown molding frame you have trimmed around the bar counter. Thanks
Thanks for your ideas here. I used many of them to build my home bar. It came out better than I had originally hoped. If you’re interested, I can send you some pictures.
Glad my post was some help to you and yes I would like to see some pictures. Thanks Chris
Hello,
Great instructions, I already have a framed L bar but am looking at using your plans for the bar top and just have one question. With the bar top being 1.5” after having stacked two pieces of 3/4 piece of plywood, what did you do to finish the back edge, or the edge on the side of the bartender?
Hi Brad glad to hear you are building a bar, just happen to be building a new bar myself. As for your question I bought some pine trim at Home Depot. I had the trim sticking up above the bar about an 1/8″ so when I poured the epoxy for the bar top it wouldn’t run off. I used pine trim because it was cheaper than oak and with the same stain it still looked good. Just look for some flat trim that’s at least an 1 1/2 wide that will cover the edges of your two sheets of plywood.
Pingback: 15 Easy DIY Bars for Your Next Home Project – My Blog
Hi there.
Did you have to anchor the bar into the floor? If so can you explain what you did?
Thanks
Hi Joe, no I did not anchor bar to the floor, the only place the frame was anchored was where the bar frame meet the wall, there just happened to be a stud there. This bar was so heavy not much worry about it moving. With that being said, if you want to attach to a concrete floor you can buy Tapcon screws. They are concrete screws that will go into concrete by using a concrete drill bit for the hole first and then screwing the Tapcon screws in. It is easier to do if you have a hammer drill to drill with. You have probably seen the Tapcon screws before, they are blue in color and at most home improvement stores.
Pingback: Do You Want to Get Luxurious Home Features? Be Inspired with These 28 Fascinating Home Bar Ideas - Home BnR
OMG Cy I have those exact same blue and gold glasses looking to build a small free standing bar 2 or 3 stools only with shelves under want to put knotty pine veneer wood for the exterior and have nice cabinet grade plywood that I had a kitchen bar built with for the top also have leftover trim from that project just looking for a frame plan that only uses 1 4x 8 for the top would like maybe a small work area behind the bar we share a lot of different type of hooch so need shelves that will hold 1.5 wines and the big bottles of Stoly, Crown, Jack you know the size I have an idea but would prefere some professional advise…#done some stuff but not real confident
Pingback: DIY – How To Build Your Own Oak Home Bar ~ John Everson
Thanks for sharing your amazing idea with us. I really like it. I definitely going to follow your tips. I am also thinking of build a farm house from a very long time and I keep your tips in mind. Keep Sharing like this.
Thanks Kelly, glad you enjoyed my post, good luck on your own bar and farm house.
Very nice bar!! Did you use pocket holes to build the frame in the first picture? Or did you just shoot screws in from the top and bottom go put the frame together?
Just used screws in the top and bottom to put the frame together, hope that helps
WHat is the width of the top countertop and how much does it hang off on the inner side. You mentioned it hangs 10” off the other side where the bar stools would be. Thx
Pingback: make your own bar – DXP
Thanks for all the help. Great bar plans! Where can I send you pics of the one i built?
Would you mind sending me pics of your bar? I’m thinking about building one. Williestylz72@gmail.com
Thanks
Pingback: 20 Insanely Clever Upgrades for your Home | How To Build It
Pingback: How To Build Your Own Home Bar - Home Decorating
I really like your bar plans, would it fit through a door or am going to have to build it in place and leave it with the house when I move ?
It is going to be too big and heavy once you are done. Just plan on leaving it with the house.
Where do I buy the Chicago Bar Rail?
You can get it from Hardwoods Incorporated, I have a link on the article I did. Look for it there.
Pingback: 20 Insanely Clever Upgrades for your Home | How To Build It
Pingback: 20 Insanely Clever Upgrades For Your Home – How To Build It | Get DIY ideas & inspiration for your home design & DIY projects from How To Build It. Best tutorials online for refinishing furniture, DIY creative home & more.
Can’t wait to get started on my own in about a month!! Approximately how much did you spend on lumber??
Cheers!!
Mike I did this about 10 years ago and to be honest, I don’t remember. Good luck on your own project.
Gordon it’s amazing your post is still going strong…you did a great job with making it easy to follow!!!
Thanks Mark, I appreciate the assist. I too am amazed by the strength of this post and how its still helping people for over 10 yrs now.
Mike,
If it helps I built mine about 6yrs ago and the materials cost about $700, I used reclaimed wood for the top and make my own bar rail which saved me some $$$
Mark
ANy advice for materials for an outdoor bar? Live on Long Island. The bar will be out on my concrete patio underneath a small deck.
You could always try and use Marine Epoxy that the put on wooden boats, that may hold up as long as the bar isn’t being baked all the time by the hot sun.
Gordon, I still can’t believe the bar help rolls on after all theses years, wonder how many home bars you have inspired ??? The farm is looking great, great looking wood in the bar room. Regards Mike Grady
Gordon! I’m so glad you’re still responding. Congrats on the success of this post. 10yrs is awesome. Found this post in early 2021 and this as my primary inspiration. I’m struggling with materials, though, and could only find 1/4″ birch veneer panels at Home Depot. Would these be too thin to cover my frame? I think you used 1″ veneer for yours, is that correct?
Thanks, and looking forward to uploading my pics when I’m done.
thanks for the interest in this post, I am still amazed by the responses it still gets after 10yrs. I think my oak veneer ply would was 3/4 thick but would have to go to the original post to look. Who knows is if Home Depot still carries oak veneer. I wished I could be more help but after this long your guess would be as good as mine.
I looked on line and Lowes have 4×8 sheets for 68.00, hope that helps
Allow me to be the first to comment fo 2022. Liked your bar build. I see other bars similar, but my interest is getting enough info/pics for the shelving area. Regarding sheets of oak veneer ply, it now costs $93.00 at Lowe’s.
Hi Joe, I don’t own the home where the bar is anymore but I did build another one that the shelves are similar to that bar. Email me at gordonmilligan56@gmail.com and I can get you measurements and pictures. Good luck on your bar.
Can you help and advise me in building a small basic L shape bar for my 3 x 4 summerhouse. I am very good with DIY but do not feel comfortable working with dangerous machinery. I work for Scottish Ambulance Service and have seen all the things that go wrong. I did tech drawing at school and very able in my understanding. Would love to do this myself but need a little advice and a plan